Monday, January 30, 2012

Pinterest Pick of the Week! Slow Cooked Chili


Ah ha!

After a week end of issues signing in, I'm finally back!  Wooo!  (Not sure what was up...)

Either way, it's that time of week again. Time for my latest Pinterest Pick!

"We want the room reveal!" my imaginary readers are shrieking.  I know you do... But I think I'm going to hold off for OOOOOONE more project. Just one. I promise.  It'll be worth it.

Instead, I'm going to explode with enthusiasm over the chili recipe that I found!  

Okay, so I'm a HUGE chili fan.  There are few things I find as satisfying as a bowl of chili.  Especially when it's slow cooked for.ev.er. So when I cam across this awesome base recipe on Pinterest, I knew I had to give it a go.


The recipe itself is simple. Throw the handful of basic ingredients into a crock pot for 8-10 hours on low and tada!!!! Chili.  But like i said.  It's a base recipe.  The beauty of this recipe is that you can add nearly anything you want and it's going to be amazing.  So I added corn, mushrooms, extra ground turkey, black beans and a can of Rotel.  You know... for an extra kick.

Wanna know what I got at the end of the day?


This amazingly amazing chili.  It was hearty enough to eat on it's own but we paired it with cornbread.  (Which, by the way, was too dry. Gotta work on that...)  Not only did it smell and taste amazing, it made enough for hubby and I to enjoy leftovers for DAYS. (I even gave some away!) All for next to nothing. 

Wanna try it too? Here's the base recipe, which started out on allrecipes.com before being pinned!

Ingredients

  • 2 pounds ground beef
  • 2 (16 ounce) cans kidney beans, rinsed and drained
  • 2 (14.5 ounce) cans diced tomatoes, undrained
  • 1 (8 ounce) can tomato sauce
  • 2 medium onions, chopped
  • 1 green pepper, chopped
  • 2 cloves garlic, minced
  • 2 tablespoons chili powder
  • 2 teaspoons salt
  • 1 teaspoon pepper
  • Shredded Cheddar cheese

Directions

  1. In a skillet, cook beef over medium heat until no longer pink; drain. Transfer to a slow cooker. Add the next nine ingredients. Cover and cook on low for 8-10 hours or on high for 4 hours. Garnish individual servings with cheese if desired.


Holy wow! One step. That's awesome. 

If you make it (and you should!) leave me a comment and let me know what YOU added to it.  I've been reading all over the net the different things you can. Everything from beer to cocoa powder. Please, some one tell me they've tried the cocoa powder and it was amazing.  Cause for some reason, it sounded delicious to me. 

Ah, chili. You are a delicious dish indeed.


Photobucket

Thursday, January 26, 2012

Baby Leg Warmers. A Tutorial for the Masses.

I came across a pic the other day of my oldest wearing a pair of baby leg warmers.  And I just squealed over how cute he was!


Then I squealed again because I remembered that in June, I'll have another to dress in baby leg warmers. Yay!  

In case you didn't know, baby leg warmers are NOT just for keeping legs warm.  These things are amazing. perfect for the gaps between pant legs and shoes... even better for those onesie clad cuties learning to crawl.  (Ever wonder if the babies mind the carpet rubbing on them when they start crawling?  I would...)

However, a pair of stylish baby leg warmers will run ya about $12.  Not bad, but my inner cheapskate crafter won't allow that.  Especially when I can make the same thing out of a pair of socks!

Wanna know how? Here goes!  Sugar Crumbs first tutorial!

DIY Baby LegWarmers
(That literally take 10 minutes to make!)


First, you're gonna need a pair of socks.  Any pair will do aside from the ankle length socks but I prefer knee highs. That gives some room to grow.


Cut off the feet.


Once you've cut off the feet, you're going to want to measure aboooout 2" in the center of the foot.  I've pinned off a 2 inch section to show. It doesn't have to be exact so if you don't want to measure, just eye ball it a little. (That's what I did. Shhhhh.)


Cut out that section and get rid of the toe and the heel. You don't need them! (Or hold onto them. Goodness knows when you make need a spare heel or toe.)


Take the 2" section and fold it in half. I find it easier to do this around my hand so that I can make sure it's even.


Once you've done that, you're going to take your little folded piece and put it around the cut edge of the sock. It should form a tube. Keep your raw edges facing outward (You should see nothing but raw edge if you look at the sock.)


Now for the hard part. Sew around the edges but DON'T sew the sock shut. You just want to connect the raw edge of the cuff to the raw edge of the sock.  You can do this by hand or machine. Machine definitely is quicker.


Done!

Seriously, that's it.  

Now go! Make a million!  But before you do, take a look at this sneak peak for the room reveal.


Photobucket

Monday, January 23, 2012

Pinterest Pick of the Week! DIY Chalkboard Paint

So I had a pick in mind for today but I decided to hold of on that one till the next post.  Because the next post is going to be the first room reveal of the Sugar Crumbs household!  

So today, to take it's place, I'm going to share a super cool, super easy tutorial that is pinned EVERYWHERE on Pinterest.  

DIY Chalkboard Paint. 

SO chalkboard paint is pretty self explanatory.  You use it on just about any surface and tada! You have a chalkboard.  The downside?  Not only is it pricey, it only comes in limited colors.  And by limited, I mean green and black.

Boring.

Thanks to the millions of motivated DIYers out there, there are now tons of recipes to make this awesome paint at home.  And all you need is latex or acrylic paint and non sanded tile grout.

And, of course, upon discovering this, I wanted to chalkboard paint... well, everything.  

I settled for a mirror.


I've had this mirror forever.  More because I like the frame than anything else. I'm not often using it as a mirror.  However, it's the perfect size for a memo board.

So I mixed 3 tbsp of acrylic paint with 1.5 tsp of white non sanded tile grout and painted the mirror.  


Muuuuuch better!  Now I have a place to write down those little things I need remember... Like appointments I quickly make. Or phone messages (Do people actually take those?)

This whole thing cost me a whopping 2 bucks.  And I still have paint to use! 

(Wonder if Jon would let me paint the fridge like this blogger did?)


Ahhh, I love it!  


** Have a pin that you want me to review?  Leave me a comment or email me at yaysugarcrumbs@gmail.com!**

** Follow me on Pinterest to see what I'm loving. Click the button on the right!**


Monday, January 16, 2012

Pinterest Pick of the Week!

Ah, Monday.  And not just any Monday.  It's the very first week of the Pinterest Pick of the week. Oh, do I have a gem for you!

So not long ago, I was doing what I do best and browsing pinterest.  Not really looking for anything in particular, I came across a pin for something called a "Mind Jar."


(Tada! A Mind Jar!)

The Mind Jar is literally a glittery fluid filled jar.  Almost snow globe like.  According to the blogger, she uses this as a replacement for time outs.  Whenever there's a tantrum or some upset, she shakes the jar and the child is to sit and watch the glitter fall to the bottom.  It should take about five minutes for it all to settle.  By the end of that time, the child is calm/distracted from the original issues.

Sounds pretty awesome, right?  I thought so too.  Luckily, the original blogger posted abit of a tutorial for this awesome idea.  Hot water, a tube of glitter glue and glitter combined in a jar will create the mind jar.

And there's no science behind it.  Seriously.  I just added without measuring anything.  


I added blue food coloring to my water because, well, I like blue. But feel free to add whatever color you want. Or don't. It's all up to you.  So this is my "Mind Jar" all non shaken like.


And here it is all shaken up!  

Beautiful.  And believe it or not, it works!  Anytime there's any anxiety in the house, the Mind Jar is shaken up and watched.  The kids tend to get impatient waiting for it to settle but they always end up calming right down. Maybe it should be a Calm Down Jar? 

It definitely should be... Even Jon and I use it just to recenter when we get over whelmed.

(We use it more than the children, honestly.)

I'm giving this Pinterest a 2 thumbs up.  Even if you DON'T have children, this is an amazing tool for calming. And it's way pretty to look at.


Want to make your own?  Head over to Herewearetogether.com for a basic tutorial.  And if you do, be sure to leave me a comment and let me know if I'm the only one entranced by the awesomely awesome Mind Jar.


Saturday, January 14, 2012

Keeping It Clean: Homemade FAIL.

One of the hardest things about going home made with cleaners is the commitment.  At least, for me it is. If I make a whole bottle of all purpose cleaner, I'm going to want to use that whole bottle just so I don't waste supplies.  Even if I hate it.

(For the record, I don't!)

So when I was emailed the suggestion of oven cleaner, I thought "Why not?"

To me, a home made, ORGANIC, oven cleaner seems amazing.  I can't stand the fact that I have to put such harsh chemicals in something I use to prepare food.  I don't know, even though it get thoroughly rinsed out, it still seems icky.

Unfortunately, with the way I cook, I have to clean the oven out kind of often.

A reader sent me a recipe tip she found online.  Apparently you sprinkle your oven with baking powder and then spray vinegar on it. Then let it set for a while.  In the end, you're supposed to be able to wipe the grease and grime away.

Simple enough, right?

Here's how it went.


So there's the oven post chicken roast grease explosion (don't ask...).  And there's the picture of the oven after the cleaning.  If you click the pic, you'll see there's not much different.  It did clean some surface mess, but the sticky grease remained.  

I'm going to call this tip a FAIL for the Sugar Crumbs house.

However, home made oven cleaner did interest me so I did some research.  And found these recipes.  Maybe one of you will have success, I know I'm going to try a few!


Most of these call for the same ingredients.  Baking soda and water.  But each has it's own twist, whether it's salt or ammonia. One commenter even adds scrubbing with a salted lemon!    

So I guess it's back to the oven for me. I'm determined to find something that works! Oh  well... at least my all purpose cleaner is amazing.  

And that, dear reader, is for next week!


**Have a tip or recipe you'd like to see tested?  Leave a comment or Email me!**

Wednesday, January 11, 2012

Epically Epic! (And a giveaway that's equally awesome!)

I recently had the awesome pleasure of ordering from an amazing Etsian. I do my fair share of Etsy shopping but every so often come across a seller that I have to share with the world.

Epically Epic Soap Co. definitely earned some blog time from me.

I came across Epically Epic Soap very randomly. And I'll admit, I only clicked on her shop because of the name. I was online looking for a gift... Clicking into the Bath and Beauty section was purely accidental. But the name was so enticing that I couldn't bring myself to hit the back button.

10 minutes later, I was checking out of the shop with a few gifts for... well, me. (I still haven't purchased a gift for the person I was supposed to be shopping for. Bad Erin!)


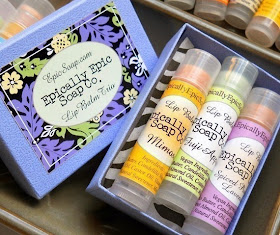
A week later, this glorious little assortment of products arrived in my mailbox.


Am I the only one who has never heard of Lychee scented... anything? I saw this solid "Multi Purpose" lotion in "I Love Lychee" and couldn't resist. Shop owner Allison claims this as a personal favorite and I can see why! It smells incredible. The scent is lightly floral. And thus far I've used it as a hand lotion, a cuticle softener and a fragrance. Multipurpose indeed!


Bullfrog scented lip tint. I was a little worried about that till I read that most of Epically Epic's products are Vegan. It's actually peach, cherry, lemon and gin scented. Not Bullfrog at all... Which was a relief! The tint is subtle and lovely. The scent is enticing. I find myself applying more liberally than necessary just to get a whiff. Yeah, I'm weird.


Ah, Almond Honey Oatmeal Moisturizing Soap. You are the best friend to my winter skin. This is soap is super moisturizing. With 4 skin thirst quenching ingredients, how could it not be? The lather is amazing and yet again, Allison nailed the scent. It's sweet scent is not overpowering and give way to a nice clean fragrance. And the hand crafted appearance makes it perfect for display!

All in all, I am one happy girl. So happy that I have to share with one of you! So I'm giving away one of Epically Epic's AWESOME gift sets.


This gift set will include 3 of Epically Epics delicious and amazing scented lip balms, randomly selected by Allison herself.

Want a chance at it? Leave me a comment telling me what Epic Item you'd gift from Epically Epic Soap.

(Wanna double your entries? Like me on Fb!)

The winner will be randomly selected and annouced Saturday, January 14th at noon!


**I'll be reviewing shops monthly AND holding a giveaway for the shop of the month! Have a shop you'd like to recommend? Leave me a comment or email me at yaysugarcrumbs@gmail.com**


**Congrats to Ronice for winning this month's giveaway!**

Monday, January 9, 2012

Pinteresting... Very Pinteresting, Indeed...

It's true... I've been sucked into a world of endless amounts of humor, recipes and inspiration.

I'm addicted to Pinterest. (Please tell me I'm not the only one!)

The problem with Pinterest is that there are so many things on there, I just don't even know where to start.


Should I cook that delicious shrimp and mushroom alfredo?


Or maybe crochet that gorgeous chunky cowl?

Nah... I'll just repin it so that I remember to do it later. You know... after I finish looking at the rest of the pins. That hour.

No good, Erin. No good.

So I got to thinking. Pinterest is made for sharing. So Mondays I'll be featuring my latest Pinterest obsessions. Whether it be a recipe, tutorial or silly collage of pictures, you're going to see it.

Which means more projects and more reviews of tutes. Yeeesssh!

**Follow me on Pinterest to see what's caught my eye today**


** Have a Pinterest Interest you'd like to see demonstrated? Leave me a comment or email me at yaysugarcrumbs@gmail.com!**

Thursday, January 5, 2012

Keeping it Clean: The Fine Art of DIY Cleaners. Pt 1

I am SO excited to be blogging today. So excited!!!

As you may know (and if you don't, where have you been???), I'm into DIY... everything. Anything I can make at home, I'm going to. So with all the chatter I've seen online about DIY cleaners, I thought "Hey! I should share some of my most favorite, super awesome, home made cleaner recipes!"

(Inner Erin is very enthusiastic about sharing!)

So for the next few weeks, I'm going to be doing just that! Tell you're friends, tell your family! Because my first post, dear reader, is for something that you probably use several times a week.

Laundry Detergent!

I don't know about you but I HATE buying laundry detergent. With two kids and a messy husband (okay... I'm the messy one. Sigh.) I do A LOT of laundry.

(AKA, Jon does. What can I say? I hate doing laundry MORE than buying detergent.)

So rather than spending the bajillions of dollars on detergent and fabric softener, I just make my own. And making the laundry detergent is saving me, oooooh, about $200. At least.

Wanna know the recipe? Wanna???

Sugar Crumbs Totally Sweet, Totally Cheap (but awesomely effective!) DIY Laundry Detergent


  • 1 box of borax (76 oz)
  • 1 box of washing soda (55 oz)
  • 3 bars of Fels Naptha or Pink Zote

Start by shredding the three bars into a lined bucket. I just line it was a garbage bag and use a hand grater.

(A food processor will work as well, but I'm not sure I'd use it for food ever again.)

Once you've shredded all of the bars, add the entire box of borax AND the entire box of washing soda.

Mix thoroughly.


Pour into a cute (or in my case, closest) empty container.

The. End.

Seriously. That's it. So let's add up the total cost.

The box of Borax was $4.39. I used the 20 Mule Team Borax. The box of washing soda was $2.99. My brand of choice was Arm and Hammer. And the Fels Naptha bars were .99 a piece. That brings us to a grand total of...

$10.35.

Now, are you ready for the awesome part?

You only use ONE TABLESPOON per load.

Which means this laundry detergent will last 1 year. That's doing laundry 7x a week (which is what the average American is doing weekly!)

So here are some key notes before I sign off!

  • Suds do NOT equal clean. This is a low suds detergent. Which means this detergent is H.E. effective :)
  • It is cloth diaper safe!
  • If you feel you need extra cleaning powers (aka you're the mother of messy little boys!), feel free to add a small container of Oxy Clean.
  • And last, but not least, enjoy the amazing smell of the detergent as you make it! I love how my house smells laundry detergent day!

There ya have it! Home made detergent, tried and true. Hope you love it as much as we do!

** Have any cleaner recipes you'd like to share? Or interested in seeing something in particular posted? Leave me a comment or email me at yaysugarcrumbs@gmail.com!**


Tuesday, January 3, 2012

Happy 2012!

Ah, a new year :)

"But where were you last year?"

Hold on... I'm getting to that. As I was saying, Aaaah, a new year. A new chapter. Hopefully one I'm not in charge of the timeline of.

Yep. The reason that I was missing in action for nearly half a year was because I was put in charge of a timeline. Not a work timeline, mind you. That I can handle. No, I was put in charge of handling a timeline that involved life outside of toy making and crocheting. I know, you didn't know I had one of those things called a life! (Truth be told, I just discovered it!)

So let's recap 2011.

Let's start with major event number one. Jon proposed. I said yes.


(Yes, he does usually carry around a sophisticated black umbrella. He's gentlemanly like that.)

After that came the emotional roller coaster called house hunting. Nothing, I mean nothing, could have prepared me for how difficult that was going to be. I felt like my sons after a late bedtime. Cranky and a little (a lot) emotional. I'd like one house, Jon would hate it. Jon would like a house and I'd be ultra supportive and say "Let's get this one."

(No, that's not true. I often found that I didn't like the houses he liked.)

Finally, we found a house we both liked and we bought it. Closed in July. I wish I could say it was that simple buuuuuut it wasn't. And that's another story for another time.

So we bought the house in July and planned to get married in October in the Keys. Plenty of time to start painting and getting the house ready to move into! It was the perfect plan!

However, we decided to do this.


Yep. We eloped. In early August. Ya know. Only 2 weeks after we closed on the house.

Aaaaand a week before the craft show. The craft show that calls in 40,000 people.


The show went well! Aside from being flooded out. I'm not kidding. We were literally flooded out.

As for the rest of the year? Well, its been a lot of home improvement projects. Which will be all be revealed in other posts at later times.

Oh yeah... and being sick as a dog... Thanks to this October discovery.


Lol, okay... I think that this post alone has proven I should NEVER be allowed to timeline.

Unless it comes to home improvement. Which brings me to my 2012 resolution.

Get these projects done so I can share with all of you!

That's as far as I'm taking my resolution... Otherwise this year will be like last year.

But that, my dear reader, wouldn't be all that bad! 2011 was beautiful.